Wednesday, 22 May 2013

Art Journal Page :)

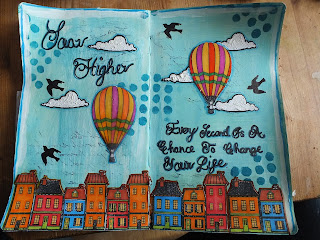
Art Journal page from me this morning to share inspired by this quote from Jennifer Grace on her Onwards and Upwards Blog Event.
And inspired by Vicky Papaioannou's Art Journal Style and this page in Particular. Check out her blog and amazing Videos which are stunning.
Well on to my Page:

I painted the pages with Gesso first and then a some Kaisercraft Sea Breeze Paint. 

I used Kaisercraft Tropical Water and Dylusions Dotted Flowers 5x8 Stencil to add some dimension.


I used  some Bird and Cloud Stamps which I got free with the New Magazine that has come out called Get Stamping. I stamped the clouds on to paper and stuck them down and used Texture Paste to add texture.and went round them with Sky Blue and Black Promarker to make them stand out. 


For the Quote Soar Higher Every Second Is A Chance To Change Your Life I found a font called  Baroque  Script from 1001 Free Fonts site that I liked and copied it first in pencil and then went over it with my Black Promarker and then Azure Promarker. 


The Balloon was another free stamp from the set which I stamped on to paper coloured in with Lipstick Red, Gold, Mulberry and a Green Promarker and then stuck down and went over with Glossy Accents. This was fun especially on the second Balloon I did my youngest cat trod on it before it was dry and left a foot print so I had to add more in the hopes it would be ok lol. 


The houses were another stamp from the free set. Again I stamped on to paper, cut them out and coloured them in can't remember colours off the top of my head this time lol for all the bits I used Soft Medium Gloss to stick them down and gave a coat over just to make sure they actually stuck down for good. I only used a thin layer so they aren't that shiney. Oh and I also dabbed some Blue Stazon ink on the brazed side of a Script Embossing folder to use as a stamp. At first I wasn't sure as it hadn't worked as well as I had hoped but now the whole page has come together I am rather pleased. 


Thank you for stopping by and I look forward to reading peoples comments :) 

Tuesday, 14 May 2013

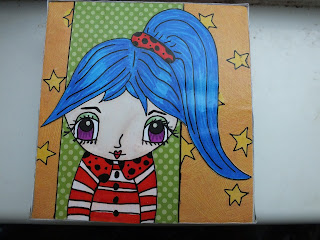
4th Canvas Finished which makes a Complete Set :)

Morning Folks, I spent yesterday making my 4th Whimsy Girl Canvas as I felt one more would complete the set. :) No doubt I will make more some time in the future as they are fun to do and each Girl looks to have a different personality. 

So the Canvas started out here, Drawing my Girl on to lined paper as I find it helps with my proportion sizing. Then Tracing her on to Card and out lining her with my Black Glaze Sukura Pen. This took me an hour too do. 

Next up is the Colouring, let me tell you it is a challenge to find the colours I want to use  as I have the complete collection of Promarkers including the limited edition ones and I keep them all in a large shoe box so searching through them all can take a while. 


And here is my Whimsy Girl all coloured up, the actual colouring took  me an hour and a half.


I then gather my chosen papers which happened to be both sides of  Echo Park's  papers called Sunshine and  Big Dots from the Splash Collection. I went round the circles with a Black Sukura Pen and gave false stitching and drew a line down each strip to make the paper strips stand out more. And I used Kaisercraft Black Paint for the edges and to do her eyes. Then used White Kaisercraft Paint for the White dot in the eye. 


For the Sides I used the Zig Zag side of the Big Dots paper and then the Black and White Zig Zag  paper called Sailing  from Three Bugs in a Rug's Under The Sea Collection. 


And after a total of 5 1/2 hours, here is my completed Canvas and so worth it.

And here are all four Canvas's together. 

So that's it from me for the moment, thank you for stopping by and if anybody fancies having a go at making their own Whimsy Girl Canvas why don't you check out Megan's Blog, this link will take you straight to her sign up Workshop Page


Saturday, 11 May 2013

Second and Third Whimsy Girl Canvas's :)

First up is my second Canvas using Echo Parks Yellow side of a Paper called  Sunshine  from the Splash Collection and strip of  paper from the same Collection Called Big Dots. I used my Black Sukura Pen to add false stitching. 

For the Whimsy Girl I drew her out on to lined paper and once happy with her I traced her on to Cardstock and coloured her in with Promarkers. For the Eyes I used Kaisercraft Black Acrylic Paint to colour the main Eye, Eye Lashes and Eye Brows and The Kaisercraft White Acrylic Paint to add the White dots. 

For the Sides I used the Zig Zag Side of the paper called Big Dots  from Echo Parks Splash Collection and the Zig Zag side from a paper called Sailing from a paper collection called Under The Sea by Three Bugs in a Rug.

I do feel this Canvas needs something else besides the glitter. Thinking Black edging like on my first Canvas, but fear I may ruin it if I do anything else. 

My Third Canvas started off with a Yellow Paper with Stars on from a 6x6 paper pad by K & Company which seemed to be school themed. I used a Black Sukura Pen to go round each of the Stars so they stood out and then I used a Green Dotted Side strip of paper called Rad Plaid from Echo Parks Little Boy Collection. And again used a Black Sukura Pen to go down each of the sides to make it stand out more. 

I used the sane tracing technique to draw out my Whimsy Girl and Coloured her in with Promarkers and The Kaisercraft Black Paint again for the Eyes, Eye Lashes and Eye Brows and White Paint for the dots. 

For the sides I used another sheet from the K & Company Paper Pad and some more of the Zig Zag paper called Sailing from Three Bugs in a Rug. Can you Tell I love this paper as I have used it for all three Canvas's so far. :) Think I need to add some Black edging but will see. They look rather good all sat together and I like how each of the Girls look to have a different personality.

Watch this space for a forth Whimsy Girl Canvas as I think one more will make the collection Complete. I have Her drawn out ready in my Lined paper pad so just a case of transferring her to card stock and letting the colouring and creation flow. 


Saturday, 20 April 2013

First Journal Page since September 2012.

So I haven't Art Journalled since September last yr it would appear from my last entry and though I have wanted to I have just been lazy and put off by the amount I end up having to put away after having done a page.

This 2 page spread hasn't turned out to bad, I feel that it is finished and trying to do any more to it would ruin it.


I used Dylusion Inks, Acrylic Paints, Promarkers and Stampotique Stamps to create this page and it was totally random that I got home from a day trip out and just got loads of my journalling bits out and created this page.


I think I should have possibly used my Black Glaze Sukura Pen to do the Journalling so It stood out a bit brighter, but I ended up using a Black Biro. Maybe I will go over the writing later. 


Wednesday, 6 March 2013

Just The One Layout, wish there was more to share

Hi Peeps, It really has been a long time since I have done any crafting of any kind and my biggest reason for this is I found out I was pregnant before Christmas which was a shock, but I suffered with really nasty Morning Sickness which left me feeling really crap and energy-less, not being able to keep any drinks or food down. But thankfully I am back to my normal self apart from the tiredness.
 Here Is a layout I attempted the other day, I had planned to ease my way back into scrapbooking by following some you tube class videos but ended up gathering the bits together I wanted to use and ended up putting this layout together without the use of a sketch or video.
 For the base I used Echo Park's Candy Cane paper from the Every Body Loves Christmas Collection, but felt once everything was stuck in place that it needed something else and embellishments didn't seem to stand out so I used my Black Glaze Sukura Pen and went round the edges highlighting some of the Hexagons.
 I also went round the Scalloped shape too with the pen to make that also stand out. I then cut some Snowflakes from some felt ribbon which was backed with tape so easy to stick.
 The photos were of Me and my Brother with our Dad and our childhood Cocker Spaniel Chloe on a Snow Day and we had built a Snowman and Chloe decided to knick the Carrot Nose lol.
I used the snow Border from the Border paper from the Everybody Loves Christmas Collection and then letter Stickers for the title.  And then wrote my journalling.
So that's it on the layout. I did have a Valentines Card I wanted to share but I will have to try and upload on next post as I don't seem to have taken the photos of it yet. 

Tuesday, 13 November 2012

Double Layout and A single Layout :)

So its only taken me 5 years to Scrap Christmas "07". I have had the photos printed for some time in size 2x3 inches and this was way before I knew about Projects such as Daily December, So they have been sitting there. I decided to put together a double spread and do a Highlight of Christmas for that year.

I didn't use fancy papers this time, just wanted to do a quick and simple layout. I used White Card Stock (the sheets you find in the sleeves of new albums) and then stuck down a sheet of 12x12 Red Paper from a cheap pack that my Mum was Kind enough to pick up. I had to do a little bit of cutting down the photos so they all fit properly and I mounted them up on to some Striped Christmas Paper from Three Bugs in a Rug - North Pole Coboodle Kit. And I also used some stickers from this kit too.


I then used a Black Glaze Sutkura Pen to Doodle and False Stitch around the edge. 

For the second page I did the same as the first and used Three Bugs In a Rug - Plaid sheet from the same Kit to mount the photos. 
I did the same with doodles and used Alphabet Stickers for the title. 

Next up is My Single Layout based on this Digital Template: 
My Adaptation: 
This layout was done using purely Echo Park Papers, Love the bright colours. The Zig Zag part was the fiddly part, as any one knows me working with measurements isn't my idea of fun lol. 
I cut a strip of paper buttons and using a Decorative Punch I bordered either side of the strip and then used a Black Promarker with fine nib to go round the edges and inside the heart to make it stand out. 
I covered Chipboard Stars in patterned papers and then used a Black Promarker to do the outlines again to make them stand out. 
I used Alphabet Stickers to do the title. Some were from Echo Park and others were from Dovecraft. 

So that's it from me, but have quite a few projects that I'm hoping to get going with so hopefully it won't be long till my next post. Also Who's taking part in Daily December this year. I know I have not successfully completed the last years, But I am hoping that this years will be a blast as I have decided to follow in Ali's foot steps with the Album Size and Simplicity. I have found my chosen kit and its an old one I won a while back. All will be revealed soon as I am very excited and keen to get started. If your reading this and have no idea what Daily December is click Here

Thanks for stopping by :) 


Friday, 2 November 2012

My Home Made Costumes and a Layout :)

Hi So since the Blog Hop I participated in I had a mad a rush to get a couple of Costumes put together. Every year our local Christian Centre puts on a Party in the evening, on the same day of Halloween  to try and keep kids entertained so as they won't go Trick or Treating. I personally feel this is great as the kids are able to be dropped off for a couple of hours and play some party games, have a dance at the disco, have tea , still have the chance to get dressed up and generally have a fun time. As really that's all kids want. My boys are certainly more than happy going to the party instead and have tons of fun too. Well apart from my 9 yr old who isn't really into any of it, a handful of sweets and he's happy lol.

So this years theme was The Ugly Bug Ball, So I spent Three days in a row putting together Middle Son Oscar's Costume - The Hungry Caterpillar and my Youngest Connor's Lady Bird Costume.

I absolutely love how these turned out. I found picture on Pinterest which linked to a tutorial on how to make a Caterpillar Costume for a 2 year old. But I adapted it to fit a 6 + year old (it fits my 9 yr old to, So will do for future book weeks :) ) Instead of felt and just one colour I picked up two shades of green in this type of silky furry fabric, though it was nice as it gives a look of different texture as the fabric moved. I used different coloured ribbon down the spine, but had an issue with Fraying so clear nail varnish came in handy to seal the ends. If I were to do the costume again I would probably go for pieces of felt. I made drawstring neck and bottom. and the middle parts I put in elastic. Because I made the costume a tad to long I hoisted the costume up a little and wrapped a belt round Oscar and then let the costume flow over it.

The Hat, was a lucky find. I found a site called Fleece Fun where there are lots of different templates and best of all they are free, I picked up some Red Fleece from the local fabric shop and some Royal Blue and Yellow Squares of Felt for the eyes and Antennas and then followed the instructions to make the Bug hat I had found but I sewed in place the eyes before putting the whole hat together.

Connor's Costume was more quick and Simple. I had in mind to sew some panels of black felt on to the front of a red t-shirt, but whilst searching for the Wings and Deely Boppers I had placed some where in the house after buying them from the Pound Shop a while back, I found some black and Red with Black Spots Fur Fabric which I forgot I had. So my whole plan changed to making  a simple Ta-bard, Plain black at the front and the spotty at the back and then wings and boppers on job done.


Today has been the first day I have scrapped anything in a while Ukscrappers has just had a Cybercrop, I think its just coming to the end saying that. And I have been lurking about and checking out the classes. I have to say your spoilt for choice as to which to start first. There are seriously some very talented people out there, the classes are all stunning. So if you find your stuck for something to do or need to kick start your mojo go and take a peek, you wont be disappointed.

Here is my layout take from The Patchwork Papers Class by Suzysnail :
I tried my hand at Machine Stitching again, not fantastic, but it will do. I inked the Blue Card Stock with black ink before sticking it to the main Brown Card Stock and I decided once everything was stuck in place it needed some thing else to make the papers stand out a little so I added false stitching using my Black Glaze Sukura Pen.
I then used this little Butterfly Pin in fabric flower embellishment by websters that I got in a sale as it seemed fitting. Though I feel it needs some more sparkle, so may add some another day when I have some lol.
Then my Title, simple "I love you Mum" as the photo is of my Mum. Its very rare to manage to get a photo of her so felt I had to scrap it. I used letter Stickers from Echo Park and then Thickers to spell out Mum and as they didn't stand out I used my Black Sukura Pen to out line the letters.
Thanks for stopping by :)