Friday, 19 July 2013

An actual Layout

It has been a while since I have actually done a traditional layout. But last night I decided to get my boys off to bed and do some scrapbooking and my printer actually played ball and printed my collage of park photos I took when I got my new camera in May.
So here is my layout and some close up shots: 


I used, Echo Park's Hopscotch paper from the Playground Collection, Heart Border from the Borders paper from the Sunshine and Happiness collection and "An adventure waiting to happen" chipboard from the chit chat chipboard pack from Bella BLVD's Mr Boy Collection. 

I also used a couple of stickers from the BLVD's Mr Boy collection too along with some Echo Park stickers from the Dots & Stripes Metropolitan Alphabet Sticker sheet. 


Not overly happy with my journalling as ran out of space, but not a lot I can do bout it now. 


Sunday, 7 July 2013

June Spread of Project Life and AJ page.

Hi peeps, Feeling proud of myself for catching up and keeping up so far with my Project Life. Here is My June spreads:  


I have still been using Snap letter stickers and Scraps of card stock and Echo Park Photo Freedom Kits to put my pages together.

Next up is my Art Journal page using my Sister in Laws favourite quote and a Cute dragon digi Stamp Called Sleepy Dragon. I used loads of different inks over a Crafter's Workshop Stencil which I can't seem to find at the moment to give you the name of. (very strange the art gremlins must have been in my art cupboard lol). 

However I can give you a break down of Promarker Colours I used:


Body of Sleepy Dragon - Bright Green, Lime Green and Zest Green. 

Spikes, feet pads and belly - Petrol Blue, Marine and Turquoise.  

Wings - Aubergine, Plum and Amethyst  

Tree - Burnt Sienna and Cocoa.


Flowers - Pumpkin, Amber, Magenta, Rose Pink, Amethyst, Orchid, Bright Green and Tulip Yellow. 


P.s I noticed after I completed the page and gave the letters a coat of Gel medium that I had missed out the R in Memory lol but never mind lol. 


Monday, 24 June 2013

Project Life

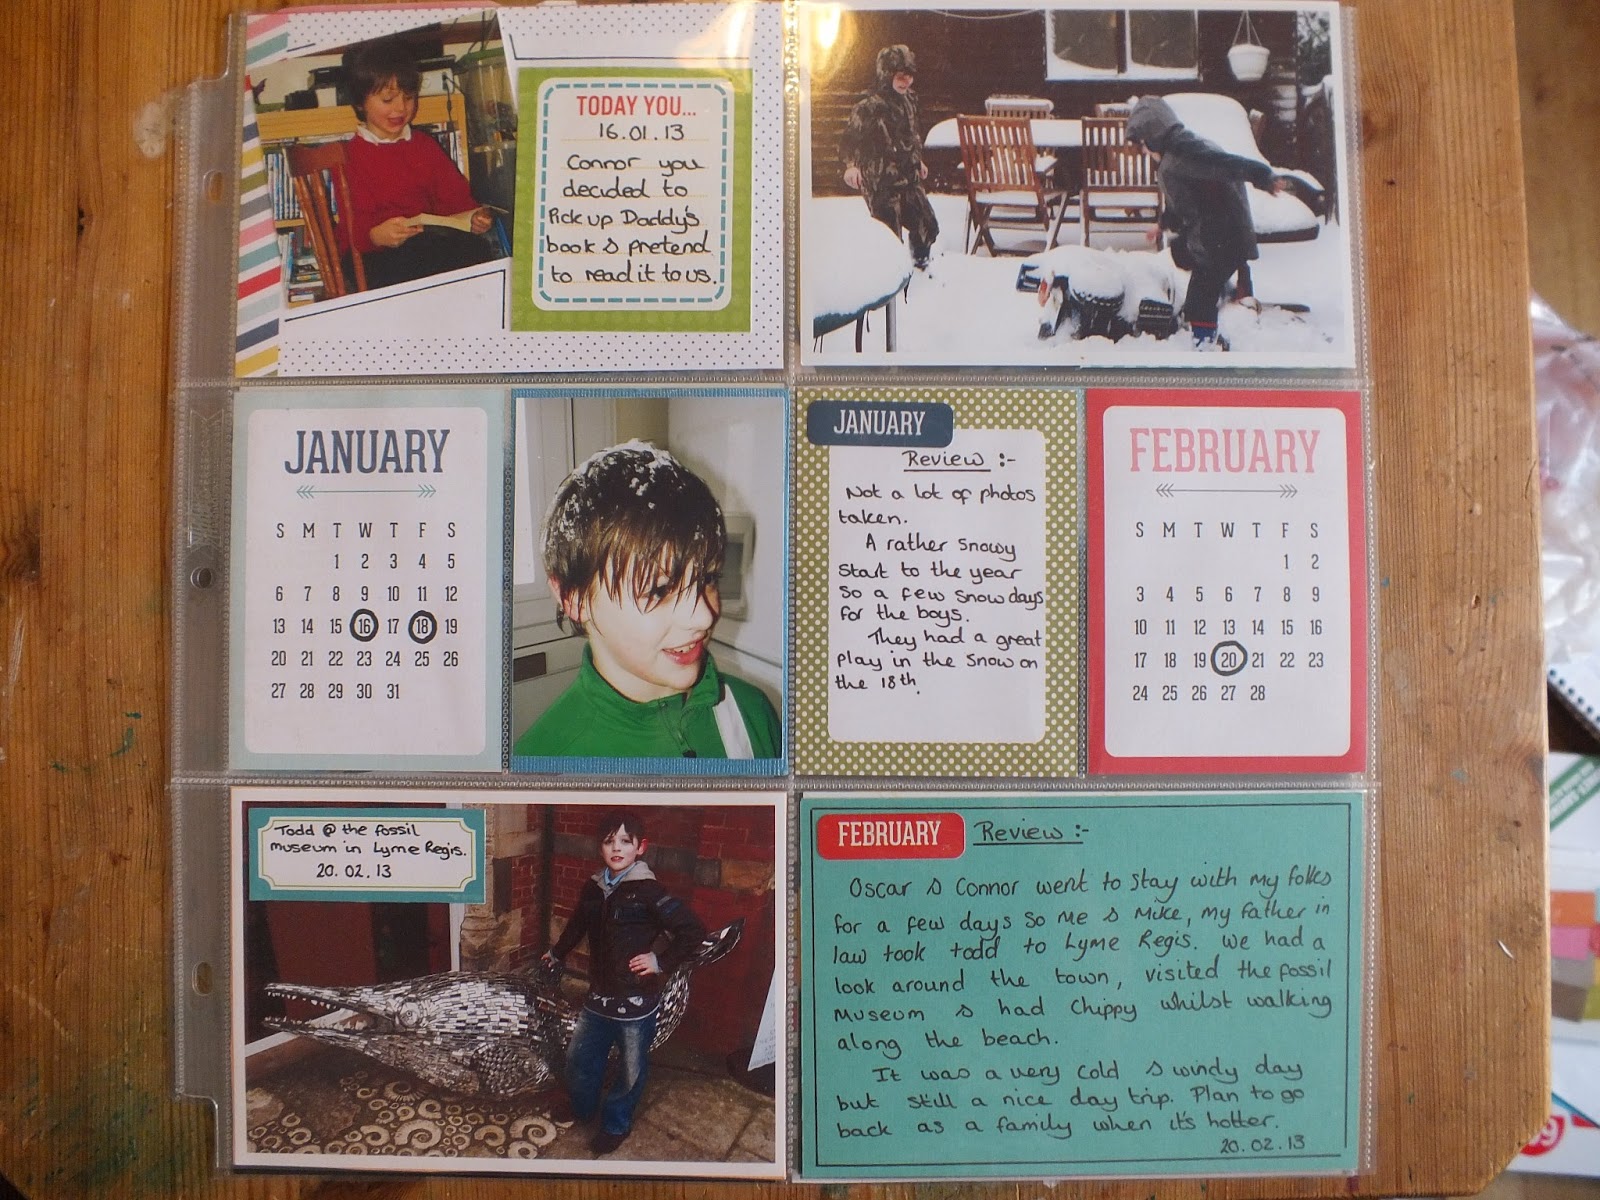
So I decided to bite the bullet and have a go at Project life, typical me decides to give it a go a few months in but hey ho, I have caught up and rather pleased with it so far. It's more a month in review at the moment, as I didn't have enough photos for the past months, but I really wanted to start from January. 

January & February 2013


March 2013


April 2013, Side one.


April 2013, Side 2.


May 2013

To create my Project Life so far I have been using Echo Parks Photo Freedom Kits - Volume 1 and Happy Go Lucky, Snap Stickers - Letters and Typeset and scraps of Card. 

I would love to know peoples thoughts :) 

Next up and last of all to share with you is my card I made for Hubby for his Birthday the other day. I have had this Digital Stamp Called Zombies on Parade, which was free, saved on my computer for a while now as had hoped to use it last yr but didn't get round to it. So this yr I finally put it to use. Hubby loves Zombies so figured it would be perfect. 

I used Bo Bunny's Whoo-Ligans Collection for the papers. 


And coloured the Stamp in using Promarkers

Skin - Emerald & Grass
Hair - Walnut, Cocoa, Terracotta
Gums - Pink Carnation
Man's Trousers - Azure & Cyan
Man's Top - Pumpkin & Amber
Girl's Skirt - Aegean & French Navy
Girls Top - Yellow, Poppy, Berry Read
Woman's Shoes - Honeycomb
Woman's Swim Suit - Magenta & Carmine
Baby's Nappy - Powder Blue
Balloon - Poppy, Berry Read and Blender.
Streamers and Umbilical Cord - Crimson. 


Tuesday, 11 June 2013

My Messy Bessy Colouring. :)

Thought I'd have a go at some more colouring. This time all I had was the names of the Colours to use for the dress so no tutorial to follow and I had a play with some purples to do the hair.

So here is my coloured Messy Bessy By Sheri Baldy Stamps and you can purchase her here.

Sorry photo isn't all that great, It has gone all gloomy outside so the lighting isn't great. Think I still need to practice hair as though the colours I picked seemed to work I think I need to get the hang of shading better. 

For the Dress I used - Petrol Blue, Marine and Turquoise.

For the Hair - Aubergine, Plum and Purple.

The Flower and Shoes I used - Carmine, Magenta, Mulberry and Bright Green. 

For the Lips - Ruby

And Last of all the Skin I used - Ivory, Blush, Almond and Pastel Pink. 


Sunday, 9 June 2013

Saturated Canary Rose Red Colouring :)

I had such fun the other day with the Lady in Red Challenge that I decided to have a look through some more of Donna's Tutorials and Colour Combos. I decided to have a go with Blue shading, Brown hair and A different Colour skin combo than I usually use. 

For the Blue Dress I used -  Sky Blue, Artic Blue and Powder Blue.

The Bodice - French Navy, Cobalt Blue and Powder Blue.

The Hair - Oatmeal, Ginger, Spice, Terracotter and Chesnut.

The Skin - Ivory, Blush, Almond and Pastel Pink.

And for the lips I used Salmon Pink and the Eyes I used Cool Aqua.

Would love to know what people think and any advice on how I can improve my colouring will be most welcomed. 

Friday, 7 June 2013

Something A Little Different for a change. :)

Just a quick post from me, It's my entry to the June Challenge over at Donna-Marie's Cards and Promarker Tutorials over on Facebook. The Challenge is called "Lady in Red". Basically you can use any lady Digi, but her clothes have to be coloured Red.The judge will be looking for the best blending and dimension possible. And Entries are to be in by Sunday the 30th June and the competition will be judged the day after. 
There are some fantastic Picture Tutorials by Donna over there, so If you fancy having a go at the challenge or just learn more on how to use your Promarkers then head on over and check the group out. 

I used two of the tutorials over there to colour this Digi stamp by Simply Betty called My Funky Valentine. 

For the Red Clothes and Umbrella I used Burgundy, Berry Red, Red and Lipstick Red and then for the Hair I used Buttercup, Tulip Yellow and Mustard. 

For the skin I used my usual combo - Ivory, Dusky Pink and Blush. 
The Chocolate Box I used Aegean and Gold.

And last of all the feathers and Buttons I used Mulberry. 

Hope you like her and would love feed back. I really enjoyed spending the day colouring her as it made a change from all the Art Journal Pages I have been working on recently. 

Thursday, 6 June 2013

Forth Art Journal Page :)

When I came across this quote the other day "Take a deep breath, its just a BAD DAY not a BAD LIFE " I knew it was one I wanted to use in my Journal and seemed fitting to use when I started My page yesterday as I was feeling grumpy and fed up, though it was a perfect sunny day. 

Here is my completed page. I started off by printing a Digital Stamp from a kit called Block Party Stamps by  Ziggle Designs by Kami form Scrap Orchard, Which was another freebie I downloaded ages ago. I printed one of the stamps on to A4 paper and stuck onto my double spread. I then used some Blue ink and a Imagination crafts stencil template called Butterfly Blossom Border to create little flowers in the back ground. For the Quote I used Black Foam letters and added some white paint to make the quote stand out.


I then used a template by Crafters Workshop called Mini Bricks and some Texture paste mixed with Red and Black Acrylic paint to create a brick border on the left and right sides of the page. Once my Characters were stuck in place I stamped some Clouds and used some Black Paint and Texture paste to create rain clouds and then added gold droplet rhinestones as they showed up better as raindrops. I also added some leaves and flowers too. 

I decided to use The mouse and Hedgehog stamp from the Country Companions Stamps I had and so stamped them and coloured them in using Promarkers. For the Mouse I used Sandstone, Ginger, Pale Pink and Arctic Blue. 


And for the Hedgehog I used Bright Green, Cocoa, Raw Sienna and Sandstone. I made a mistake with him when it came to sticking though and that was using my paintbrush that I had used for lightening up some of the background paper with Gesso, so the image went a bit pale so after the Gel Medium dried I tried going over some of the areas again with the same colours and a Black Glaze Sukura Peen and it seemed to do the trick. 

Wednesday, 5 June 2013

Third Art Journal Page

 I Started on Monday on another Art Journal Page and just completed it. Inspiration came from seeing Vicky Papaioannou's recent page called Bloom.   


Here is my completed Page. When seeing her flowers I realised I had some flower stamps that I had in my stash that I hadn't used by Dawn Bibby Designs - Leaves, Flowers and the second pack Trees, but this was where my whole original idea for my page started to go off track and I was getting really interested in where my page was going to head.


As whilst looking for the flower stamps I came across some bird stamps by Fiskars called For The Birds, that didn't go with the flowers but it had a quote I liked the idea of using. "A Bird doesn't sing because it has an answer it sings because it has a song" by Maya Angelou. I used a clear stamp set called Roman Alphabet by Dovecraft for the letters and stamped with Tuxedo Black Momento Ink, but it didn't show up as black as I had hoped, so I went over each of the letters with a Pitt Artist Black Pen which though it showed up a little more I ended up going over again this time with a Black Sukura Glaze Pen which I'm now happy with. 

Then it came to me that I had a digital stamp of some birds which I thought would work, I can't remember where I got it from they have been in my Digital folder for quite some time, But think it may have been a freebie, I coloured them in with Promarkers - Mulberry, Mandarin and Bright Green. And used a Sticky Foam squares to the wings to give dimension. 


and then found some digital music note paper that I liked and thought would go with the theme so printed out that too. Which is where I started putting the actual pages together. I printed the paper out and stuck it to the pages and then went over with Orange and Yellow inks by Papermania. I then used Some Texture Paste mixed with Blue paint over  the flower part of the Dylusions Stencil Called Dotted Flowers and Used some blue ink to stamp through some of the dots. For the Flowers I stamped them, cut them out and coloured in with Promarkers - Azure Blue, Mandarin, Magenta, Cool Aqua and for the leaves I used Bright Green and Lush Green. I also hand drew little music notes dotted around the page once all the bits were stuck in place. 


Wednesday, 29 May 2013

Second Art Journal Page :)

Another Art Journal Page from me to share. I knew I wanted to use the Fox from the free set of stamps received with the new Get Stamping Magazine and thanks to a friend reminding me of a favourite film of mine I found this Quote from Fox and The Hound.

"Darlin' forever is a long long time and time has a way of changing things"

So here is my completed Page:

I covered the pages in Gesso first and then scraped Kaisercraft Tropical  Water Acrylic Paint on top.  Once dry I sprayed Dylusions Sky Blue ink Through a 6x6 template called Mini Cubist by Crafters Workshop.


I then used a framed Stamp from the set, Stamped it on to card stock and coloured the edges in  Promarkers Lush Green so It would stand out and then Apple Green for the inside. I did the writing with my Black Glaze Sukura Pen. 


I did the same with this part of the Quote, but when Stamping the Frame I felt it was too large so stamped a part of it and then  joined it to make it smaller if that makes sense. Once stuck down I used my Promarker True Blue to go round the outside of the frames so they stood out. 


More about the background I used the Tree Stamp from the free set and  only inked the leafy part and stamped all over the pages before sticking down the Journalling and the leafs I did using Dylusions Rubber Stamp set called Doodle Parts, which I stamped using green ink but went over some of the leaves with a my Promarker Lush Green. I also used a boarder stamp from Dylusions Further round the Edge Set which I stamped around edges of the pages.


Here is the Fox, isn't it so cute, I used Promarkers Raw Sienna, Cocoa and Burnt Orange to Colour them in. The second fox on the left of the page I stamped and cut out then coloured the reverse of the image, you can see he isn't as cute but I think it has character lol.  


I learnt a lesson in making this page and that is to have more patience to let paints etc. dry and also stick the next page to last to double up as when doing this page I caused some damage to my last page. Thankfully I was able to restore it and it doesn't look to bad, but still wishing it had not happened. 

Wednesday, 22 May 2013

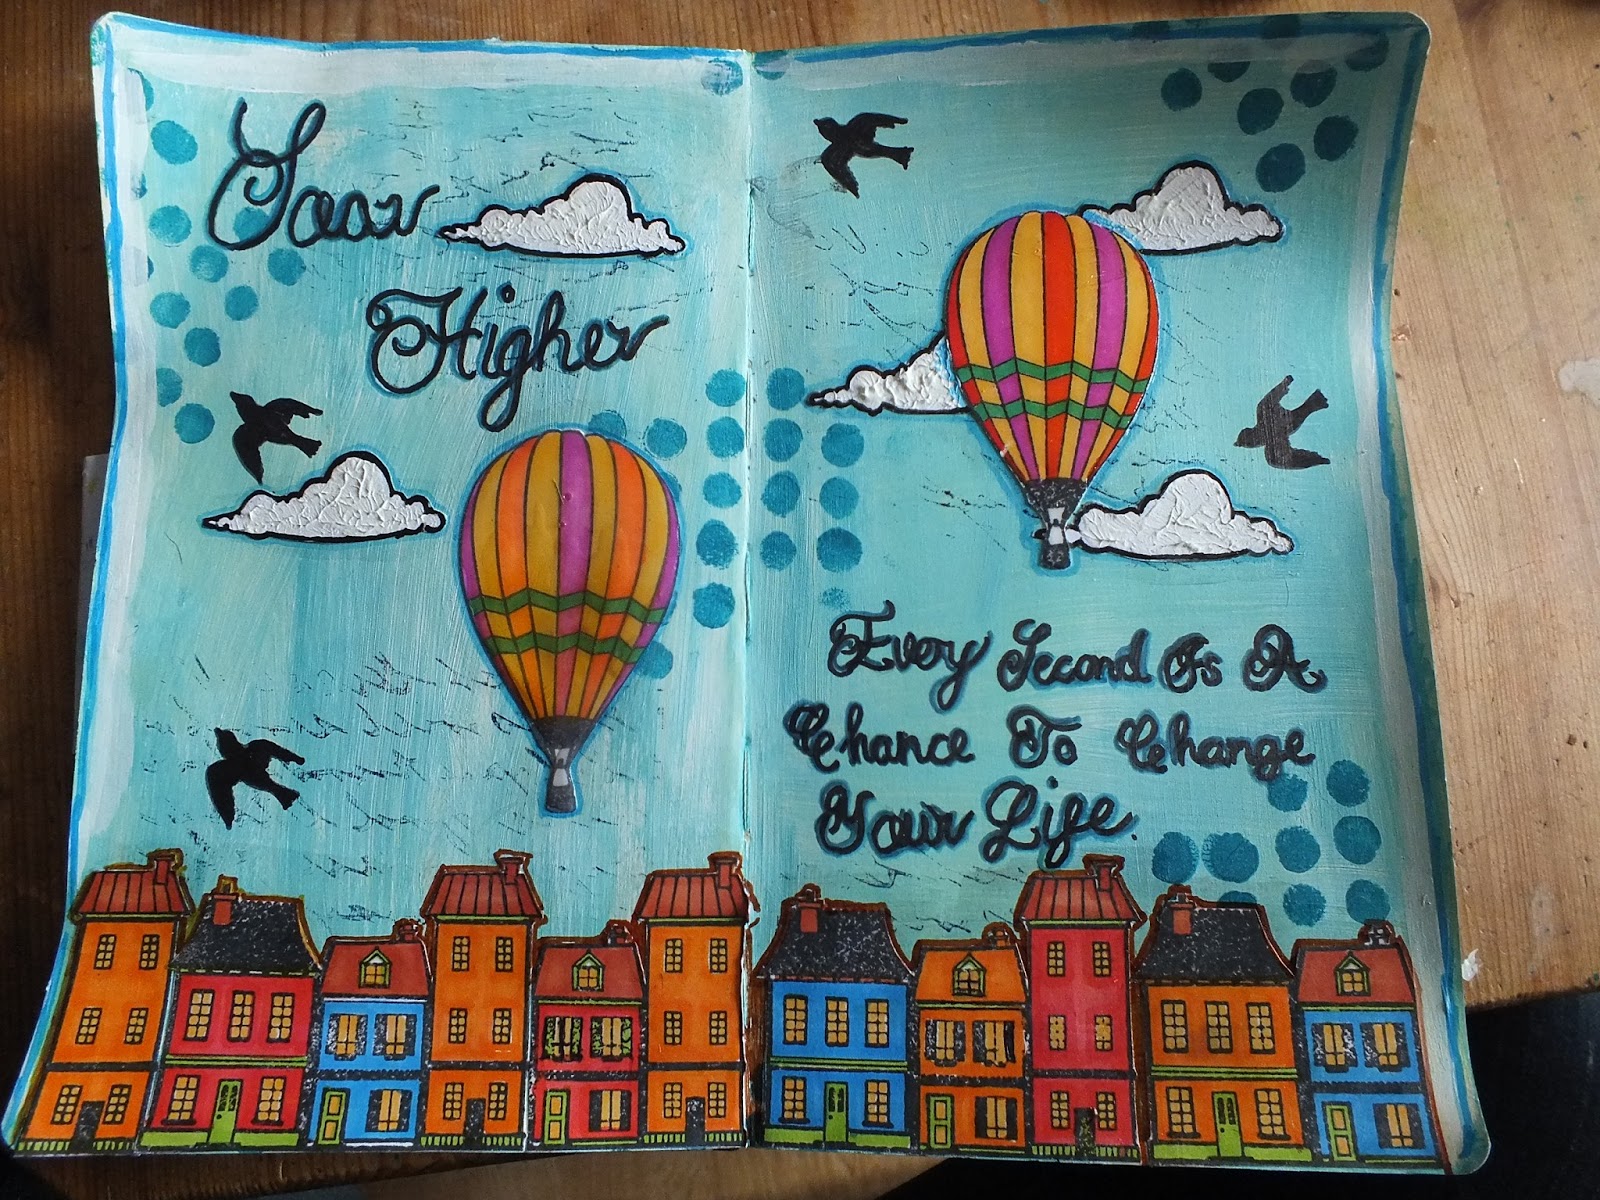
Art Journal Page :)

Art Journal page from me this morning to share inspired by this quote from Jennifer Grace on her Onwards and Upwards Blog Event.
And inspired by Vicky Papaioannou's Art Journal Style and this page in Particular. Check out her blog and amazing Videos which are stunning.
Well on to my Page:

I painted the pages with Gesso first and then a some Kaisercraft Sea Breeze Paint. 

I used Kaisercraft Tropical Water and Dylusions Dotted Flowers 5x8 Stencil to add some dimension.


I used  some Bird and Cloud Stamps which I got free with the New Magazine that has come out called Get Stamping. I stamped the clouds on to paper and stuck them down and used Texture Paste to add texture.and went round them with Sky Blue and Black Promarker to make them stand out. 


For the Quote Soar Higher Every Second Is A Chance To Change Your Life I found a font called  Baroque  Script from 1001 Free Fonts site that I liked and copied it first in pencil and then went over it with my Black Promarker and then Azure Promarker. 


The Balloon was another free stamp from the set which I stamped on to paper coloured in with Lipstick Red, Gold, Mulberry and a Green Promarker and then stuck down and went over with Glossy Accents. This was fun especially on the second Balloon I did my youngest cat trod on it before it was dry and left a foot print so I had to add more in the hopes it would be ok lol. 


The houses were another stamp from the free set. Again I stamped on to paper, cut them out and coloured them in can't remember colours off the top of my head this time lol for all the bits I used Soft Medium Gloss to stick them down and gave a coat over just to make sure they actually stuck down for good. I only used a thin layer so they aren't that shiney. Oh and I also dabbed some Blue Stazon ink on the brazed side of a Script Embossing folder to use as a stamp. At first I wasn't sure as it hadn't worked as well as I had hoped but now the whole page has come together I am rather pleased. 


Thank you for stopping by and I look forward to reading peoples comments :) 

Tuesday, 14 May 2013

4th Canvas Finished which makes a Complete Set :)

Morning Folks, I spent yesterday making my 4th Whimsy Girl Canvas as I felt one more would complete the set. :) No doubt I will make more some time in the future as they are fun to do and each Girl looks to have a different personality. 

So the Canvas started out here, Drawing my Girl on to lined paper as I find it helps with my proportion sizing. Then Tracing her on to Card and out lining her with my Black Glaze Sukura Pen. This took me an hour too do. 

Next up is the Colouring, let me tell you it is a challenge to find the colours I want to use  as I have the complete collection of Promarkers including the limited edition ones and I keep them all in a large shoe box so searching through them all can take a while. 


And here is my Whimsy Girl all coloured up, the actual colouring took  me an hour and a half.


I then gather my chosen papers which happened to be both sides of  Echo Park's  papers called Sunshine and  Big Dots from the Splash Collection. I went round the circles with a Black Sukura Pen and gave false stitching and drew a line down each strip to make the paper strips stand out more. And I used Kaisercraft Black Paint for the edges and to do her eyes. Then used White Kaisercraft Paint for the White dot in the eye. 


For the Sides I used the Zig Zag side of the Big Dots paper and then the Black and White Zig Zag  paper called Sailing  from Three Bugs in a Rug's Under The Sea Collection. 


And after a total of 5 1/2 hours, here is my completed Canvas and so worth it.

And here are all four Canvas's together. 

So that's it from me for the moment, thank you for stopping by and if anybody fancies having a go at making their own Whimsy Girl Canvas why don't you check out Megan's Blog, this link will take you straight to her sign up Workshop Page


Saturday, 11 May 2013

Second and Third Whimsy Girl Canvas's :)

First up is my second Canvas using Echo Parks Yellow side of a Paper called  Sunshine  from the Splash Collection and strip of  paper from the same Collection Called Big Dots. I used my Black Sukura Pen to add false stitching. 

For the Whimsy Girl I drew her out on to lined paper and once happy with her I traced her on to Cardstock and coloured her in with Promarkers. For the Eyes I used Kaisercraft Black Acrylic Paint to colour the main Eye, Eye Lashes and Eye Brows and The Kaisercraft White Acrylic Paint to add the White dots. 

For the Sides I used the Zig Zag Side of the paper called Big Dots  from Echo Parks Splash Collection and the Zig Zag side from a paper called Sailing from a paper collection called Under The Sea by Three Bugs in a Rug.

I do feel this Canvas needs something else besides the glitter. Thinking Black edging like on my first Canvas, but fear I may ruin it if I do anything else. 

My Third Canvas started off with a Yellow Paper with Stars on from a 6x6 paper pad by K & Company which seemed to be school themed. I used a Black Sukura Pen to go round each of the Stars so they stood out and then I used a Green Dotted Side strip of paper called Rad Plaid from Echo Parks Little Boy Collection. And again used a Black Sukura Pen to go down each of the sides to make it stand out more. 

I used the sane tracing technique to draw out my Whimsy Girl and Coloured her in with Promarkers and The Kaisercraft Black Paint again for the Eyes, Eye Lashes and Eye Brows and White Paint for the dots. 

For the sides I used another sheet from the K & Company Paper Pad and some more of the Zig Zag paper called Sailing from Three Bugs in a Rug. Can you Tell I love this paper as I have used it for all three Canvas's so far. :) Think I need to add some Black edging but will see. They look rather good all sat together and I like how each of the Girls look to have a different personality.

Watch this space for a forth Whimsy Girl Canvas as I think one more will make the collection Complete. I have Her drawn out ready in my Lined paper pad so just a case of transferring her to card stock and letting the colouring and creation flow.